Windows Gaming VM with GPU Passthrough on Linux
After completing this guide, you will have a Windows headless virtual machine that can be accessed via Moonlight for high performance gaming, with the Sunshine game stream host.
Prerequisites:
- CPU with I/O virtualization support so we can passthrough PCIe devices (e.g.
VT-dfor Intel) - Any GPU
The instructions in this guide are for NixOS, but I've also included Fedora-specific commands where relevant.
1. GPU Passthrough
Ensure that I/O virtualization support has been enabled in your BIOS.
Follow this guide to enable IOMMU in the kernel, as well as the VFIO kernel modules.
For Fedora
First, obtain the PCI vendor and device IDs of your GPU and its audio device (later referenced as xxxx:xxxx and yyyy:yyyy respectively):
❯ lspci -nn | grep -i vga -A2
03:00.0 VGA compatible controller [0300]: Advanced Micro Devices, Inc. [AMD/ATI] Navi 48 [Radeon RX 9070/9070 XT/9070 GRE] [1002:7550] (rev c0)
03:00.1 Audio device [0403]: Advanced Micro Devices, Inc. [AMD/ATI] Navi 48 HDMI/DP Audio Controller [1002:ab40]
Append intel_iommu=on vfio-pci.ids=xxxx:xxxx,yyyy:yyyy to your kernel parameters.
Note: if you are using an Nvidia GPU, it may be necessary to blacklist the Nouveau driver, by appending rd.driver.blacklist=nouveau modprobe.blacklist=nouveau.
Add the drivers to the initramfs:
# in /etc/dracut.conf.d/10-vfio.conf
add_drivers+=" vfio_pci vfio vfio_iommu_type1 "

# Then, rebuild the ramdisk
dracut -fv
Verify that the generated ramdisk contains the VFIO drivers:
# lsinitrd | grep -i vfio
-rw-r--r--   1 root     root           31 Mar 30 16:53 etc/modprobe.d/vfio.conf
-rw-r--r--   1 root     root            9 Mar 30 16:53 etc/modules-load.d/vfio-pci.conf
drwxr-xr-x   1 root     root            0 Mar 30 16:53 usr/lib/modules/5.18.18-200.fc36.x86_64/kernel/drivers/vfio
<truncated>
Install libvirt:
Reboot, and verify that IOMMU is working:
$ dmesg | grep -i iommu
[    0.000000] Command line: BOOT_IMAGE=(hd4,gpt4)/vmlinuz-5.18.10-200.fc36.x86_64 root=UUID=2a1d4d2a-7016-4f91-aa55-92d1b284668d ro rootflags=subvol=root resume=UUID=16671cec-3bb8-46bb-b931-083c93082763 rhgb quiet intel_iommu=on
[    0.133682] Kernel command line: BOOT_IMAGE=(hd4,gpt4)/vmlinuz-5.18.10-200.fc36.x86_64 root=UUID=2a1d4d2a-7016-4f91-aa55-92d1b284668d ro rootflags=subvol=root resume=UUID=16671cec-3bb8-46bb-b931-083c93082763 rhgb quiet intel_iommu=on
[    0.133749] DMAR: IOMMU enabled
[    0.224446] DMAR-IR: IOAPIC id 2 under DRHD base  0xfed91000 IOMMU 0
[    1.516533] iommu: Default domain type: Translated
[    1.516533] iommu: DMA domain TLB invalidation policy: lazy mode
[    1.560968] pci 0000:00:00.0: Adding to iommu group 0
[    1.560977] pci 0000:00:01.0: Adding to iommu group 1
[    1.560985] pci 0000:00:06.0: Adding to iommu group 2
[    1.560991] pci 0000:00:0a.0: Adding to iommu group 3
[    1.561003] pci 0000:00:14.0: Adding to iommu group 4
Verify that VFIO drivers have been loaded:
❯ lspci -knn | grep -A5 -i vga
03:00.0 VGA compatible controller [0300]: Advanced Micro Devices, Inc. [AMD/ATI] Navi 48 [Radeon RX 9070/9070 XT/9070 GRE] [1002:7550] (rev c0)
        Subsystem: Tul Corporation / PowerColor Reaper Radeon RX 9070 XT 16GB GDDR6 (RX9070XT 16G-A) [148c:2435]
        Kernel driver in use: vfio-pci
        Kernel modules: amdgpu
2. Setup the Windows VM
Boot and auxilliary drives
The boot drive of the VM should be installed on an SSD. Having a COW filesystem (e.g. BtrFS) is a plus, since NTFS doesn't have checksumming. If a COW filesystem is used on the host, a raw image (not QCOW2) should be used to avoid COW-on-COW write amplification.
If a HDD is used, ZFS (with the zvol passed through) should be used for maximum performance. This zvol should be created as sparse (-s on zfs create) so snapshots can continue to be created using unallocated space from the pool. You can keep the zvol size ~200GB smaller than the HDD.
Redundancy via RAID can optionally be setup as well.
Note: Snapshotting is not done for the boot drive because it tends to bloat very quickly.
In order:
- Ensure that an emulated TPM has been added (e.g. swtpm)
- Boot disk: Ensure SATA is set as the driver first. You can switch to VirtIO later after the drivers have been installed for performance.
- Install Tailscale, Sunshine, VirtIO drivers
Some additional performance tweaks:
- Enable CPU isolation via systemd (avoid assiging CPU 0 to the VM, as it handles other kernel interrupts)
- Enable CPU pinning (make sure to pin CPUs sharing the same L1/L2/L3 caches togther - check with
lscpu -e) - Ensure that NTFS on the guest uses the same
volblocksize(usually 16K) as the host zvol.
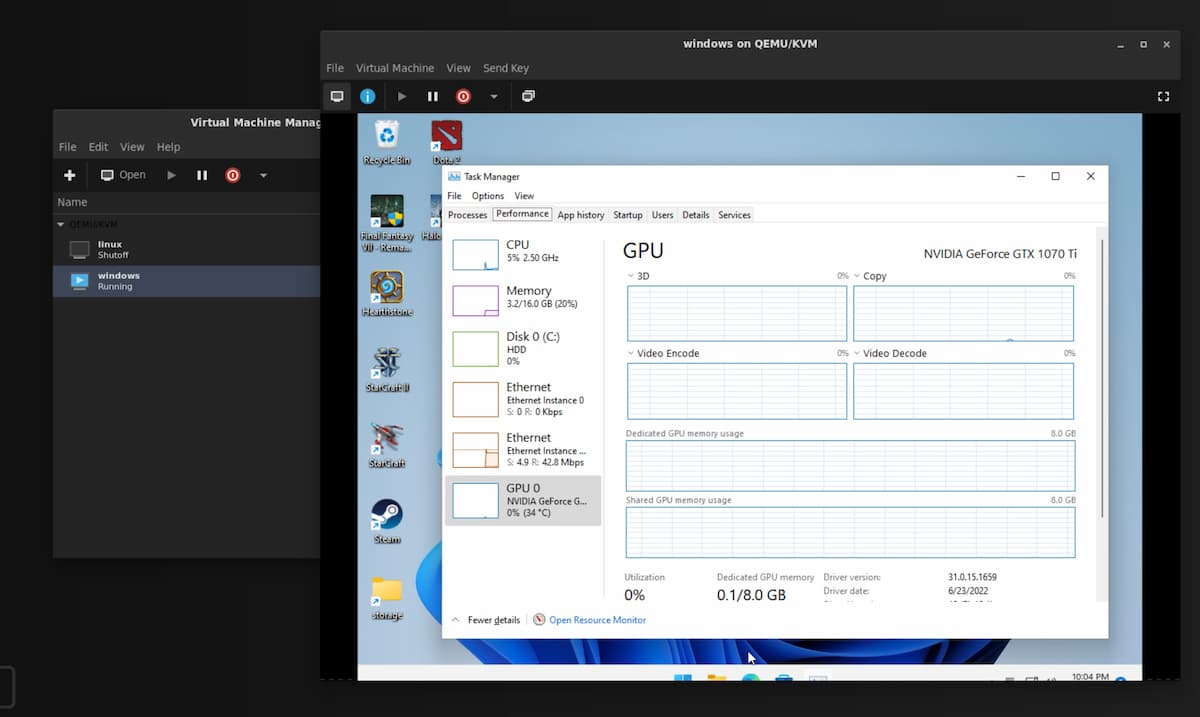
After the OS has been installed, reboot the VM and passthrough your GPUs (including the audio device) in Add Hardware > PCI Host Device.
Install the GPU drivers as necessary.
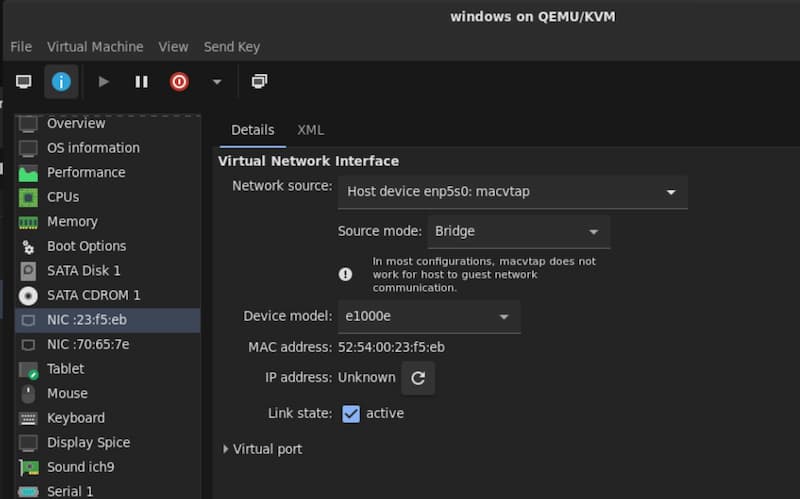
(optional) Giving the VM an IP address on the LAN
If you would like your VM also have its own IP address on the LAN (e.g. to play multiplayer games with peers on the same subnet), you can add a macvtap interface now, in addition to the standard bridge network between guest and host.
To do this, add another NIC and ensure Host device enpXsX: macvtap is selected.
If you just want to be able to access the VM over the internet, you can use a peer-to-peer VPN as shown below.
The GPU should now be visible in the guest.
3. (Optional) Share a Filesystem between host and guest
There are several options, with VirtioFS being the fastest, followed by SAMBA, then Network File System (NFS).
Note: If you are using only a macvtap interface, it is not possible to connect to the host due to how macvtap works. You will need to create a bridge (e.g. Virtual Network 'Default' : NAT) to connect to the host.
VirtioFS
This is the fastest option for sharing a folder on the host to the guest if they are on the same device.
Follow the instructions to set it up.
SAMBA
SAMBA is much faster than NFS for Windows guests. It is also suitable for sharing folders on different devices across a network.
For NixOS, you can reference the following configuration:
# Samba
networking.firewall.allowPing = true;
services.samba-wsdd = {
  # make shares visible for windows 10 clients
  enable = true;
  openFirewall = true;
};
services.samba = {
  enable = true;
  openFirewall = true;
  settings = {
    software = {
      path = "/home/user/software";
      browseable = "yes";
      "read only" = "no";
      "guest ok" = "yes";
      "acl allow execute always" = "yes";
      "force user" = "user"; # This is the most important line
    };
    global = {
      workgroup = "WORKGROUP";
      "server string" = "family-server";
      "netbios name" = "family-server";
      security = "user";
      "map to guest" = "bad user";
    };
  };
};
For Fedora:
-
Install Samba on Linux:
-
Set the correct SELinux contexts/booleans for the directories you wish to share (in this example
/mnt/storage): -
Add the following to
/etc/samba/smb.conf:[storage] path = /mnt/storage public = yes guest ok = yes writable = yes browseable = yes acl allow execute always = yesThis will create a share named
storage, accessible without login or passwords. Only do this on a secure LAN! -
(For Fedora) Open the required ports in the
libvirtzone (for the Windows guest), and in thePubliczone for other computers on the network:- TCP
139,445 - UDP
137,138
- TCP
-
Restart the
smbandnmbdaemons:
NFS (not recommended)
For sharing files with Windows clients, SAMBA is the better option (much less delay on opening compared to NFS).
Windows does not come with NFS support by default - you must enable it. In an elevated PowerShell window, run:
Enable-WindowsOptionalFeature -FeatureName ServicesForNFS-ClientOnly, ClientForNFS-Infrastructure -Online -NoRestart
This fix may speed up NFS access on Windows (although I strongly recommend using SAMBA).
Note for Fedora: You must also open the NFS ports (TCP/UDP 111, 2049 and 20048) in the Libvirt zone.
And that's it! You now have a fully featured cloud gaming machine, accessible anywhere in the world.
Known Issues/Notes/Fixes
Slow FPS on Desktop
Moonlight runs at 30fps or less when displaying the remote desktop (when not in a game). I suspect this is probably because the desktop is not rendered using the GPU and natively running at a lower FPS. Moonlight is transferring this output when the GPU is not being utilized, for example with the desktop or certain 2D games.
To fix this, download and install the Windows Virtual Display Driver. This sets up a dummy monitor which will be rendered by the GPU.
To remove the 'extra' desktop (added by libvirt), set the Video Device to None in Virtual Macihne Manager.
Note that without the video device, Virtual Machine Manager will not show any video, however the VM can still be accessed over Moonlight.
AMD GPU Reset/Reboot Issue
There is a known issue with AMD GPUs locking up the host when the guest VM is rebooted.
Some workarounds have been discussed, however in my case, the solution that works is to unsure that the guest is never rebooted. Instead, allow the guest to shut down, and then start it again manually.
I think this works because once the guest is shut down, the amdgpu driver binds back to the VM, and this somefixes fixes the state of the card.
You can enforce that the guest never reboots by adding the following to the libvirt domain XML:
Disabling VFIO
At times you may want to disable VFIO or GPU passthrough, for example when you want to use the GPU in the host.
To disable GPU passthrough, simply remove vfio-pci.ids=xxxx:xxxx,yyyy:yyyy from your kernel parameters (or boot.kernelParams in NixOS) then reboot.
Note: For AMD GPUs, this might not be necessary, as the amdgpu driver automatically rebinds itself once the VM is shutdown.
Moonlight-specific Issues
-
Moonlight requires that the server machine (whether VM or physical) be unlocked, and that there are no Remote Desktop Connections ongoing.
-
After an RDP session, the main desktop is locked. To fix this, create a batch file with the following content, and run it with administrator rights to disconnect the RDP and unlock the main desktop:
-
-
The streaming resolution of Moonlight is not what is set in the GUI of Moonlight or in the game, but rather, it is capped at the resolution of the virtual machine's desktop. So, if you want to stream in 4K, ensure you change the virtual machine's desktop resolution to 4K prior to launching the game.
-
Some useful shortcuts:
- Quit moonlight: Ctrl+Alt+Shift+Q
- Minimize window: Ctrl+Alt+Shift+D
- Show stats overlay: Ctrl+Alt+Shift+S
- Paste text from host: Ctrl+Alt+Shift+V
- Toggle mouse and keyboard capture: Ctrl+Alt+Shift+Z
-
Moonlight not filling screen:
-
Intermittent black screen: Disable hardware-accelerated GPU scheduling
QEMU/virt-manager
-
Snapshotting the VM is not possible while a PCI device is being passed-through. However, if you are using BtrFS, you can make snapshots of the storage volume.
-
VM hangs/pauses, and in
dmesgyou see[ 6044.433981] vfio-pci 0000:07:00.0: BAR 0: can't reserve [mem 0xe0000000-0xefffffff 64bit pref]and similar errors:- Ensure that the
initcall_blacklist=sysfb_initkernel parameter has been added togrub.cfg.
- Ensure that the
-
virt-manager/QEMU supports sharing the VM display via an embedded VNC server. For Apache Guacamole to connect to this however, the embedded viewer (invirt-manager) must first be closed. -
Windows XP only: In
virt-manager, the NIC device model must bertl8139, and the sound card model asAC97in order for drivers to be installed. -
Nvidia Geforce Experience says 'Unsupported CPU':
- Change the CPU model in
virt-manager(in the XML) tohost-model(preferred) orhost-passthrough.
- Change the CPU model in
-
Passthrough-ed USB devices, when disconnected, prevent the VM from booting
- Add
startupPolicy="optional"to the<source>tag in the XML for the passthrough-ed USB device
- Add
-
Low FPS when display is set to 'Duplicate these displays':
- Change display settings to 'Extend these displays' instead. I suspect when displays are duplicated, the GPU works extra to render frames on both monitors, causing the FPS drop.
-
Useful VM performance tuning options
- For example, setting multiple sockets with each having 1 CPU and 1 core is more efficient.
-
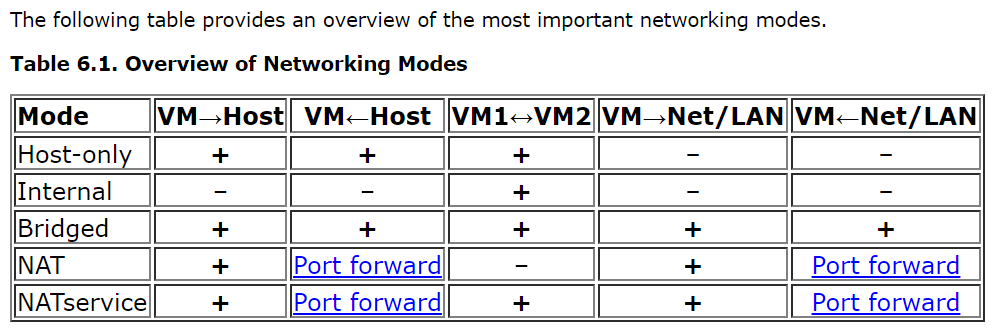
Types of VM network connections compared:
For more information on the libvirt domain XML, check out the documentation.
Apache Guacamole
- For RDP, 'Support audio in console' must be unchecked for sound to work.
Tailscale latency issues
At times, Tailscale may not be able to achieve a direct connection (e.g. due to a hard NAT), and will fallback to using a relay. This can be seen with tailscale status. This is sometimes annoying, and made complicated by the fact that when running the VM behind the same NAT as the host (e.g. behind the same network), you can only forward port 41641 (used for the Wireguard connection) to one device (either the host, or the VM's macvtap adapter). I've tried changing the listen port to 41640 for the VM, and despite being able to achieve connectivity via nc, Tailscale still intermittently refuses to use that port.
-
The default network (which you can view with
sudo virsh net-dumpxml default) is configured withforward mode='nat', which allows outbound communication for guests, but not inbound communications (unless you configure computers on the LAN to use your host as a NAT). ↩